
The primary purpose of using a VPN is to increase your data security and remain anonymous over the web. However, at times, vulnerabilities in VPNs lead to various VPN leaks, such as DNS, IP, and WebRTC leaks. Fortunately, there are ways to analyze whether your VPN leaks or not. The best way is by visiting Browserleaks.com.
VPNs are online privacy and anonymity tools that offer relief from several infosec issues, such as ISP throttling, data privacy, online monitoring, or bypassing geographical restrictions and censorship. In a nutshell, your VPN ensures online privacy through encryption and IP masking.
However, an IP leak, DNS leak, WebRTC leak, or even a faulty kill switch can disrupt any security, and you might have paid a hefty sum. So, instead of risking your privacy, it is best to check your connection for VPN leaks and patch them through the methods mentioned in this article.
How VPN encryption works
In layman’s terms, VPN encryption converts your data into a scrambled form that can only be accessed through a specific “decryption” key.
When you connect to a VPN, it establishes a connection and encapsulates the data into packets. The data packets then pass through the VPN tunnel, which is encrypted and goes to another end, where the VPN server decrypts it and connects you to your requested website. The encapsulation process makes your data undetectable over the internet.
While the VPN encrypts your data, it uses different VPN protocols. The six most common VPN protocols include:
- OpenVPN
- IKEv2
- L2TP/IPSec
- PPTP
- WireGuard
- SSTP
Each VPN protocol differs in its uses, functionality, and specifications. Some protocols focus on increasing your security level, while others might focus on high-speed and network-switching capabilities. So far, OpenVPN is the fastest and most secure VPN protocol.
It is an open-source protocol that allows anyone to look for vulnerabilities to patch. Moreover, it supports the industry-standard AES-256-bit encryption cipher that ensures protection against most brute-force attacks and other vulnerabilities.
Most legitimate VPN providers offer the OpenVPN protocol by default. Moreover, it provides two ports, UDP ensures high speed, and TCP is for maximum security. It’s up to the user to tweak the ports according to their need, making the protocol the best choice.
Apart from OpenVPN, some other considerably secure protocols are WireGuard and IKEv2. WireGuard is a recently released protocol that guarantees top-notch security and data protection. On the other hand, IKEv2 is the most preferred choice of mobile phone users because of its consistent speed.
How to check whether VPN traffic is encrypted
A popular and reliable network analyzing tool is Wireshark. It analyzes the data packets within your network traffic and presents the results in plaintext, making it exceedingly user-friendly. It supports more than two thousand protocols, from old to the latest ones.
To analyze the network traffic using the Wireshark software, you need to follow the steps below:
- First, download free software such as WIRESHARK and install it into your device.

- To start the data analysis process, you should find a web page that is not secure. For instance, the site you choose should not contain ‘HTTPS’ in the web address. A secure web page would make it difficult for you to figure out the encryption vulnerabilities.
- Now open WIRESHARK and click the “Capture” option shown at the top of the displayed page. After that, press “options.”
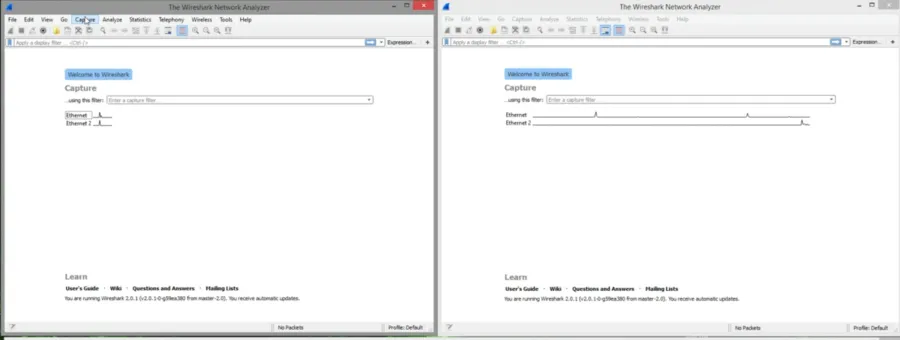
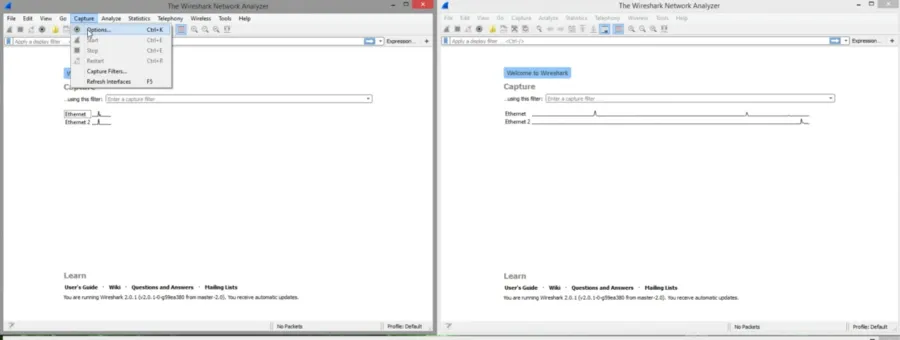
- This will bring you to a different menu that is the same as the previous one.
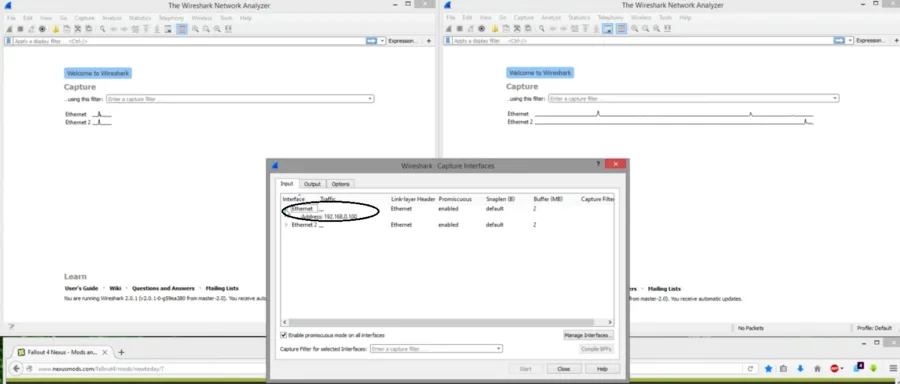
- Click on “Ethernet” to view your router’s IP address or the regular IP if you are not behind a router.
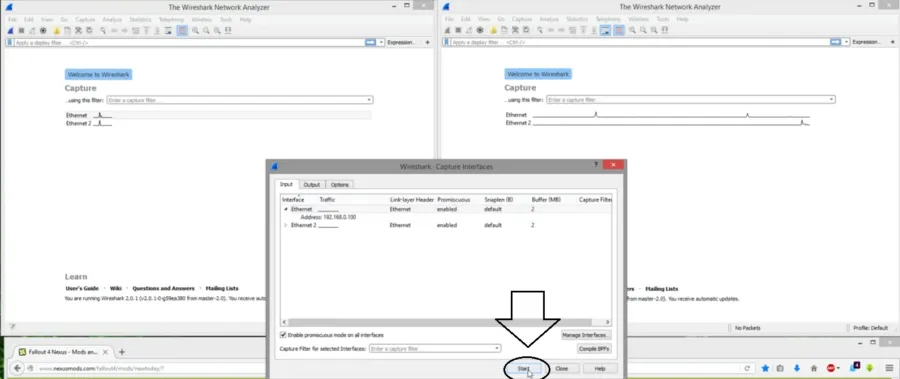
- Now hit the “start” button and reload the web page you opened on your PC. Do this as quickly as possible.
- Hit the Red Cross button, displayed at the top of the “Capturing from Ethernet” tab, to stop a long list of unnecessary capturing results.
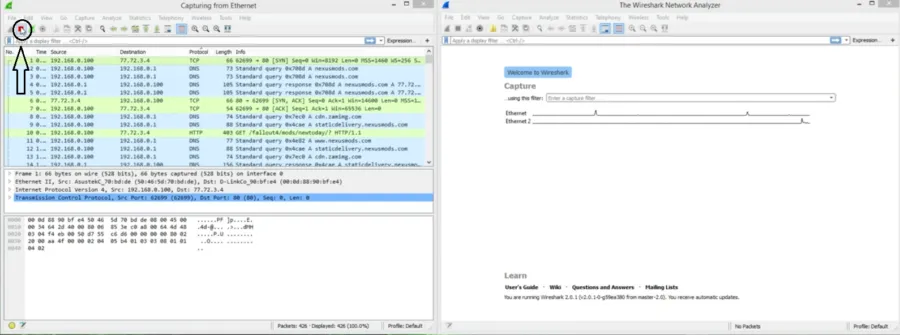
- From the displayed list of captured results, you will see the Protocols section with varying protocol results such as DNS, TCP, HTTPS, etc.
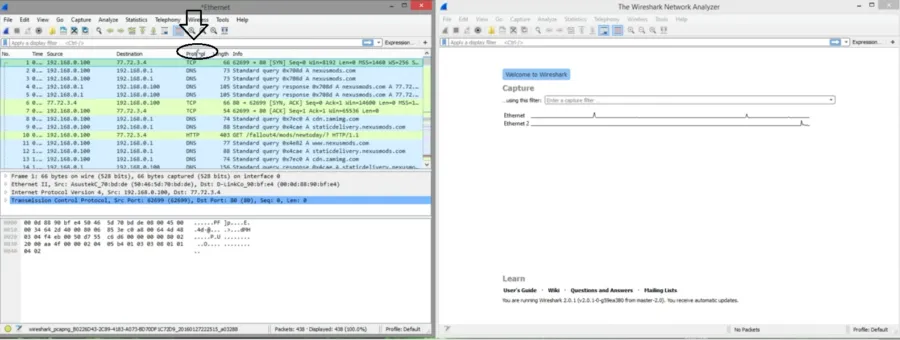
- Now, click on the different captures individually, and you will notice much readable stuff, such as web page names, in the text below.
The results show that you are not using a VPN. You can again perform the test by turning on your VPN. With the VPN connection in place, the test results should show the VPN protocol you are using, e.g., if you are using OpenVPN, there should be UDP and TCP in the results.
How to test VPN leaks
As mentioned above, encryption is not the only factor in your VPN security; VPN leaks can also disrupt the privacy you seek. Running the following tests reveals the privacy your VPN is claiming to offer:
DNS leaks test
A DNS translates the human-readable form of domain names to your IP addresses for your browser to display, which means it has every record of the websites you visit.
A DNS leak occurs when your device sends your DNS query outside the VPN’s encrypted tunnel. As a result, your VPN exposes information about your DNS request to your ISP or any third party. That can also allow hackers to launch DNS hijacking attacks and expose your IP address to criminals.
To test your VPN for DNS leaks, visit dnsleaktest.com and start with the standard test. Check the IP address of the domain that shows up.
Test Result: The site’s IP address should not match your IP address. If it does, it means your VPN is leaking your DNS.
IPLeak test
The ISP assigns the user an IP address. Your ISP knows about whatever sites you visit and all your browsing activities. Anyone other than the ISP monitoring your network can track your online movement through your IP address. Hence, it is essential to hide your IP address with a VPN.
When you connect to a VPN, your VPN hides your actual IP address and assigns you the IP address of the region where the VPN server is located. IP leaks occur when:
- You are using a poorly configured VPN.
- Your device is accessing unknown servers rather than anonymous VPN servers.
- Your IP address is being leaked through DNS leaks.
To test if your VPN leaks your IP address, conduct an IP leak test at whatismyipaddress.com. Compare the displayed IP address with your actual IP address.
Test Result: The displayed IP address should match the IP address provided by the VPN. If it’s the same, you’re protected, and your VPN is not leaking your IP address.
WebRTC leak test
WebRTC (Web Real-Time Communications) enables web browsers and mobile apps to make requests from external servers and real-time data and information from other users’ apps and browsers.
Devices using WebRTC need to view each other’s IP addresses to communicate. Many browsers use this technology by default. However, it might allow hackers, ISPs, or third-party websites to access WebRTC and find your device’s IP address. Knowing the device’s IP address makes it easy to identify its user.
It would be best to use a VPN to hide your IP address. But if your VPN can’t hide your IP address, it’s not doing its job correctly.
Conducting a WebRTC leak test to check if your VPN leaks your WebRTC is better.
Test Result: The IP address in the WebRTC test result should be the same as that of the VPN provider. If you still see your IP address after the test, it indicates potential WebRTC leaks.
Kill switch test
Note: While selecting a VPN, users should always look for security and privacy-enriched features as they enhance their digital privacy. One such feature is the kill switch. Some service providers have different names for kill switches. Like, ExpressVPN calls the kill switch a network lock.
A VPN kill switch is a security-focused feature. It turns off internet access and protects your IP address from leaking when the VPN connection drops accidentally. If you are using a VPN with a kill switch, you can conduct a test to check if it is fulfilling its promise or not.
Here are the steps you should follow to check if your kill switch is working fine:
- Open your VPN and connect to a server of your choice.
- Use the internet for streaming, accessing blocked websites, or downloading torrents.
- Now block the VPN app using a firewall, but don’t stop your online activity. This means turning off your internet connection for five seconds and then turning it on.
- During this, keep an eye on your VPN app. Reload your web pages and check if your internet is working.
- If your VPN isn’t connected, your kill switch works perfectly fine.
How to stop VPN leaks
Once you’ve tested your VPN with leaks, it’s time to look at some steps to fix them. This section of the article discusses the solutions for resolving various VPN leaks. So, let’s begin with this.
1. DNS leak solution
DNS leak occurs because you use a device operating system that fails to route your DNS request via the VPN or a DNS misconfiguration in a third-party client app.
To prevent DNS leaks, you should choose a VPN provider with DNS leak protection. If you’re experiencing an IPv6 DNS leak, disable IPv6 manually on your device. DNS leaks also occur due to Transparent DNS proxies used by ISPs. You can also try searching for those proxies and bypassing them.
Windows users might also have to deal with Teredo, a tunneling protocol, resulting in DNS leaks. You can easily disable this feature by opening the command prompt and typing “netsh interface teredo set state disabled.”
2. Disable WebRTC Leak
Some browsers come with built-in protection against WebRTC, while some do not. By manually disabling WebRTC from your browser, you can eliminate WebRTC leaks.
Disable WebRTC in Firefox
If you’re using a browser like Firefox, you don’t need to rely on a third-party extension. By following the steps mentioned below, you can do it yourself:
- In the address bar, type about config and press enter.
- Click on ‘I accept the risk‘ on the warning screen.
- Under the address bar, there will be a search box; type: media.peer connection. Enabled. The volume column will change to false, meaning you have successfully disabled WebRTC.
How to disable WebRTC in Chrome
If you are a Google Chrome user, the browser lacks the by-default settings that enable users to disable the WebRTC. You can install an extension to block the WebRTC leak or even manually do it.
Here are the steps for disabling the WebRTC leak in Google Chrome:
- Open your Chrome browser and click on the three dots on the above right side of the screen.
- Tap on More tools; an Extension section appears; click on it.
- Scroll down and click on Get More Extensions.
- In the Search Bar, enter WebRTC Control.
- Click on Add Extension.
- Now, activate the plugin. The plugin icon should be changed to a blue color to block the leaks.
How to block WebRTC leaks in Safari
You can change your browser settings and prevent WebRTC leaks in the Safari browser. The steps to do so are as follows:
- Open your browser and click on Preferences.
- Tap on the Advanced tab and look for a box at the bottom that says, Show Develop Menu.
- Close the Preferences menu, tap Develop, and head to Experimental Features.
- Select Remove Legacy WebRTC API, and you’re done blocking the WebRTC.
3- IPLeak Solution
Your VPN is leaking your IP address and risking your digital privacy. If your VPN still shows your actual IP address after the test. You can choose a VPN provider that protects against IP leaks.
Remember that not all VPN providers support IPv6 addresses. Your VPN masks your IPv4 addresses but leaks your IPv6 addresses. You can get rid of IP leaks by manually disabling the IPv6 on your device. Here are the steps for disabling IPv6.
Disable IPv6 on MacOS
The steps are as follows:
- Tap on the Apple icon > System Preferences > Network.
- Click Advanced and then click on the TCP/IP tab.
- Tap on the dropdown next to Configure IPv6, and disable IPv6.
Disable IPv6 on Windows
The steps include:
- Click on the Start Menu and type Control Panel
- Now, click on Network Internet > Network Sharing and Center.
- Once it gets open, tap on Change adapter settings.
- Right-click on the Network adapter option and then select Properties.
- Uncheck the box for IPv6 and tap on OK. Once you’re done, it means you’ve disabled IPv6.
Share this article
About the Author

Hasnain Khalid is a passionate streaming and security enthusiast, who has proved his expertise on renowned tech publishers. With a keen eye for online safety and a love for all strеaming matters, Hasnain combinеs his еxpеrtisе to navigatе thе digital world with confidеncе and providе valuablе insights to usеrs worldwidе.
More from Hasnain KhalidRelated Posts

What is VPN Split Tunneling and How Does it Work?
Split tunneling is a VPN feature for anyone accessing foreign networks while connecting to their LAN...

What is VPN Encryption? It’s Types and Algorithims
Encryption is a method for enhancing the security and privacy of sensitive data or information that ...

Why is Opera VPN Not Working? How to Fix Opera VPN?
KEY TAKEAWAYS Opera VPN is a proxy service, not an actual VPN. That’s why it doesn’t wor...

VPN vs. Firewall vs. Antivirus: Which One is Better?
KEY TAKEAWAYS VPN, Antivirus, and Firewall are the most important tools to protect your online priva...

A Guide to Choosing the Right VPN for Downloading
How to hide downloading files from ISP? From the very start of the hilarious popularity of P2P file-...

What is Port Forwarding and How Does it Work?
Port Forwarding is a technique for redirecting computer signals between the local network and the In...